Here is the photo series, condensed into one of two tables. Click on the image for a full-size picture. Text is below, or, if I have finished it ;-) you can click on the first picture and be walked through the process step-by-step with the full-size pictures.
Page 1 of 2
Start wearing your shirt, which hopefully is a proper leine (pron. "len-ya") (details not covered herein). Undergarments are optional, but are highly recommended at this stage if you have an audience you do not wish to flash. You can always remove them later to be properly "regimental" if you wish.
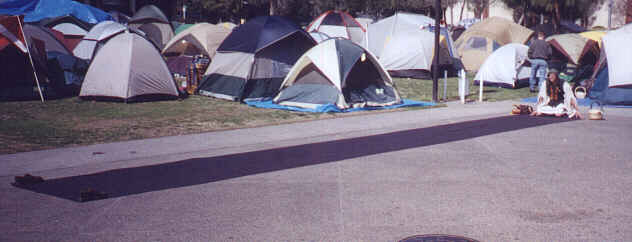
Spread the tartan plaid out on the ground/floor to its full size, i.e. 60" wide x 9' long, or what have you. You can see this being done in Photo 1, above. At this point, I find it easiest to shorten the amount of floor space I'm taking up... it's the polite thing to do, as well, if there are other Scots about shivering and waiting for space to pleat! To do this, leave the 60" wide section spread out, and just about 5-6 feet of the length. Lie down on that length part, as above in Photo 2, grab either side and pull the whole thing towards you in short pulls. Just keep going until the length is bunched up at the end, as in Photo 2. WARNING: Don't even *think* about pleating on carpet. It will be like trying to pleat stuck velcro. Smooth, polished floors, like hardwood or tile, work best by far, followed by concrete pads (sidewalks can be handy if you don't mind some odd looks). At Faire, stages (usually semi-polished/smooth wood) are popular pleating zones. Get permission first, of course.
Now, you'll notice throughout this photo series that I have various shoes, baskets, pouches, etc. placed on the corners of the plaid. Take these words to heart: Wind is your enemy. *g* Good luck dealing with it... the heavy weights cope with it better than the lighter ones, but not much. Use your brains... it'll take a LOT longer to pleat in the wind, but it can be done.
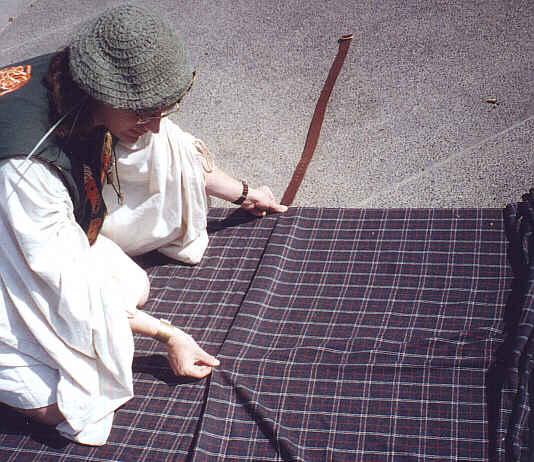
Take your belt and hold the end to your hip bone. Pull the belt over to your other hip bone, and hold the belt there. This is to measure the size of the front panel which does not get pleated. See Photo 3 above. (Note: I'll try to get this pic up as soon as I take one, the one from this series didn't come out!)
Kneel facing down the length of the plaid. Use the belt you are holding to measure off the section that will *not* get pleated (hip-to-hip distance). Now you are ready to pleat.
Your next step depends on the exact pattern of the tartan you chose, so I'll be generic here. Most tartans have a repeat pattern every 6 inches, at least, if not every 2 inches or so. PICK A BEGINNING POINT TO START PLEATING FROM. Mentally mark that line. See Photo 4 above to see me marking which point on the plaid I am to leave *UNPLEATED*.
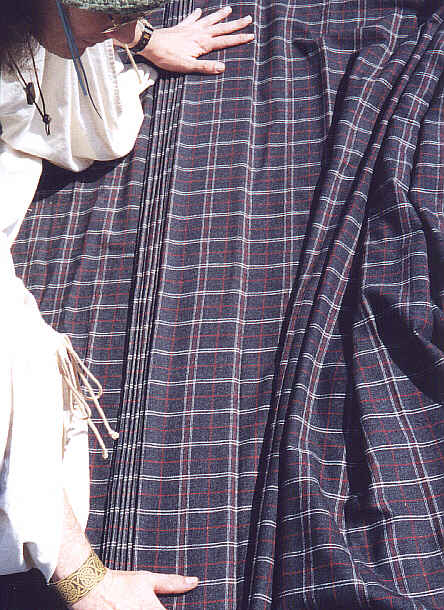
As stated before, at this point, you should be kneeling before the plaid facing down the length of it. Feel free to kneel on the flat, unpleated portion of the fabric for ease of your back! Keeping that first, starting point of the pattern in mind (or marked with your belt for the first few, as I have in the pictures), look for a repeat (read: identical line) approx 6 inches from that starting point. Spread your arms wide, and gently grasp the line of the pattern at each end of the fabric. Pull it towards you until it almost overlaps the starting reference line. Fold it smooth to get an approximately 3" pleat in the fabric. See Photo 5 above.
Repeat this for the next repeat, making sure you get the same line each time. On my tartan, I generally count four stripes to the next line, and pleat. You'll get into a rhythm once you get the hang of it. When you first start out, the hardest part is getting a neat, even fold down the full width of the pleat. Photo 6, Photo 7 and Photo 8 all show the pleating process.
One technique I use to make it easier (your mileage may vary... use whatever works best for you!) is to pull the fabric into the pleat one half at a time. I take, for example, the left edge in my left hand, and pinch the middle with my right hand and pull half the fabric into the pleat. (See Photo 5) Then hold the half pleat in place with the left hand, grasp the right edge, and pull *that* one in place. Smooth with both hands from the middle out. (Again, see Photo 6, Photo 7 and Photo 8 with these tips in mind.) As you go, the bunched up section (See Photo 9) will get smaller and smaller.
Pleat ad nauseam for almost the full length of the plaid until you get an unpleated flap about the same size as the one you measured off for your hips. (See Photo 10) Now you should have a centered, pleated section with an unpleated flap on each side. Kinda like this: ___//////___ See Photo 11 for a shot of the more finished product.
The physical pleating portion of the kilting process generally takes experienced pleaters around 15 minutes or so, depending on the style of pleat, the weave of the wool, and tartan in question. Beginners will take considerably longer, an hour is not unreasonable. Don't worry, you'll get better with practice.
The hard part is done. Sit back, admire your neat pleats, take breather, and stretch your aching back. Hopefully, the pleats look something like Photo 11.
Take your belt buckle in hand. Lay the belt, finished side out, on the ground. This part is tricky to explain. Slide the belt, buckle first, under the kilt from the side that will let you do it without catching the buckle in the folds. This is the part you were just sitting on while pleating. See Photo 12.
For example, If you start from:
This side --> ___/////___
...the buckle might have a tendency to slide right into on of the pleats from the underside.
But if you start from:
___/////___
<-----
...the other side, the buckle should slide right through without messing up the pleats.
Center the belt under the pleats approx 1/3 of the way from the bottom edge (your right, when you were pleating), and continue onto the next page to finish up. :-)
Page 1 of 2
![]() Back to Kalani's Renaissance Faire Page
Back to Kalani's Renaissance Faire Page
![]() Back to Kalani's Home Page
Back to Kalani's Home Page